A proper drip edge looks small, but it decides where rainwater goes at the roof line. I focus here on how this metal flashing protects the deck, fascia, and gutters, what U.S. codes usually expect on shingle roofs, and what to check during a reroof or repair. I also cover material choices, common installation errors, and the warning signs that tell you the edge detail is starting to fail.
What matters most before you touch the roof edge
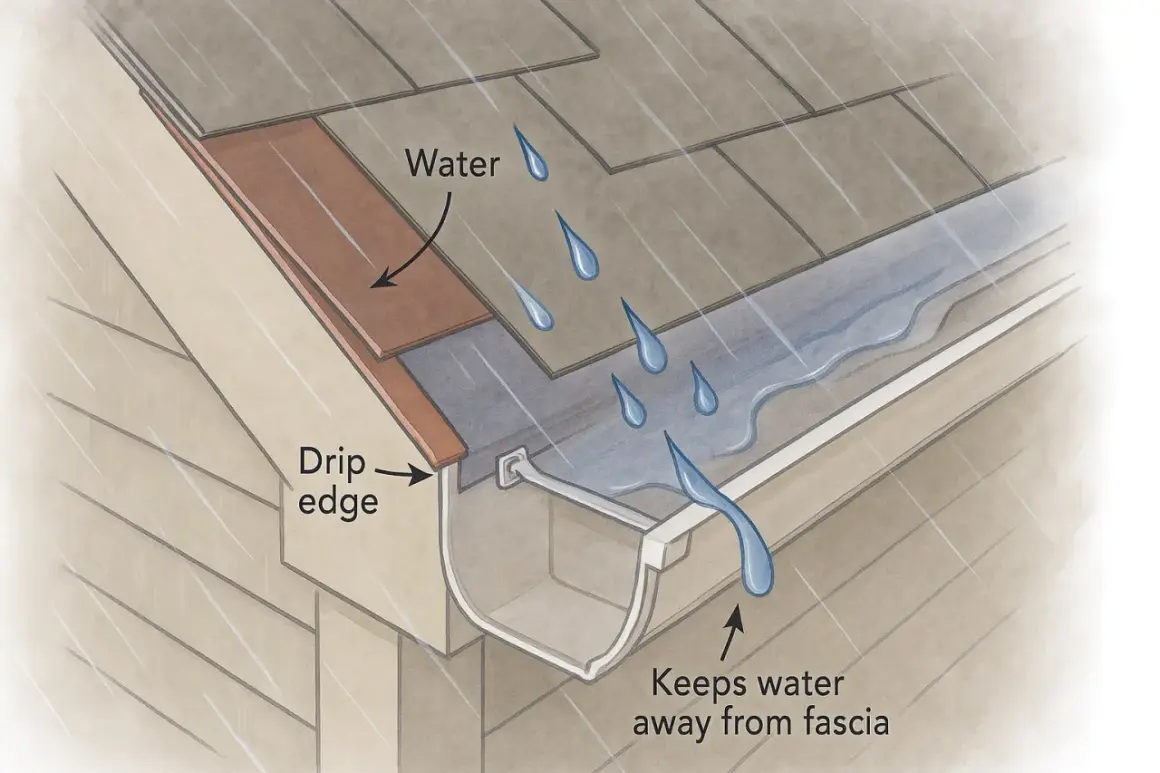
- Its job is simple: move runoff away from the fascia and roof decking instead of letting it cling to the edge.
- On shingle roofs, the common baseline is 2-inch overlaps, a 0.25-inch projection below the sheathing, and fastening at up to 12 inches on center.
- Layer order matters: the underlayment does not sit the same way at eaves and rake edges.
- Material choice matters too: aluminum and galvanized steel are the usual residential options, while copper is a specialty upgrade.
- Bad edge details show up early: rust, lifted seams, stained fascia, and gutter overflow often point to a perimeter problem before a leak reaches the ceiling.
Why roof edges leak first
The roof perimeter takes the hardest punishment on a house. Water does not simply fall straight off the shingles; wind can push it upward, surface tension can pull it backward, and clogged gutters can send it spilling over the edge. That is why the edge detail matters so much: it creates a controlled path for runoff instead of leaving the water to find its own route into the wood trim.
I think of the roof edge as a transition zone, not a decorative finish. Shingles, underlayment, fascia, soffit, and gutters all meet there, and each layer depends on the one above it doing its job. When that chain is broken, the first signs are often subtle: dark staining on the fascia, soft wood near the rake, or a gutter that seems to overflow even during a normal storm.
That is also why I pay attention to the perimeter before I look for bigger roof problems. Once you understand how water behaves there, the flashing detail starts to make sense.
How the flashing changes the path of water
The metal at the edge works by extending past the sheathing and giving water a hard surface to drop from. Instead of curling underneath the shingles and soaking the wood, runoff meets the metal, follows it outward, and falls clear of the fascia. On a roof with gutters, that outward lip helps guide water into the trough instead of letting it run down the face of the trim.
There is a practical reason I like this detail: it protects the home even when conditions are not ideal. A light wind-driven rain, a bit of ice buildup, or a gutter that is only partly clear can all defeat a weak edge setup. Properly formed metal flashing adds a margin of control, which is exactly what perimeter roofing needs.
On houses without gutters, the same idea still applies. The goal is not to force water into a specific accessory; it is to keep it away from the wood edge and away from the underside of the roof assembly. That leads directly to the rules that govern how the detail is installed.
What codes and manufacturers usually expect
For shingle roofs in the U.S., the International Residential Code sets a pretty clear baseline, and most local jurisdictions build from it. The common requirements are not complicated, but they are specific for a reason: the metal needs to shed water continuously, stay attached, and work with the underlayment instead of fighting it.
| Detail | Typical requirement | Why it matters |
|---|---|---|
| Location | Eaves and rake edges on shingle roofs | Protects the full roof perimeter, not just the low side |
| Overlap | At least 2 inches between pieces | Prevents water from slipping through joints |
| Projection | At least 0.25 inch below the sheathing and 2 inches back onto the deck | Keeps runoff away from the fascia and roof decking |
| Fastening | Up to 12 inches on center | Helps resist lift, movement, and opened seams |
| Layer order | Underlayment over the metal at eaves, under it at rake edges | Directs water out and down instead of behind the flashing |
That layering is the part many homeowners never see, but it is where a lot of failures start. If the order is reversed, water can be funneled into the wrong place rather than out over the edge. Manufacturers tend to be equally strict because the roof system only works when the edge detail is installed as designed. In practice, I treat the code and the shingle maker’s instructions as a package, not as separate opinions.
For standard residential work, I also pay attention to one simple rule: if the roofer cannot explain where the water travels at each edge, the installation probably needs a closer look. That is the same logic I use when choosing materials.
Choosing the right material and profile
Most homes use corrosion-resistant aluminum or galvanized steel. Both are common because they are easy to shape, available in long lengths, and durable enough for typical residential exposure. Copper is a premium option that makes sense on historic homes or higher-end roofs, but it is usually more than most projects need.
| Material | Best for | Strengths | Tradeoffs |
|---|---|---|---|
| Aluminum | Typical residential roofs | Lightweight, corrosion-resistant, easy to form | Can dent more easily than steel |
| Galvanized steel | General-purpose reroofs and replacement work | Stiffer feel, widely available, cost-effective | Can corrode if the coating is damaged or exposed too long |
| Copper | Premium or historic roofs | Long service life, strong appearance match for copper gutters | Higher cost and more demanding detailing |
I like to separate material choice from profile choice. A plain, correctly sized strip usually beats a fancier shape installed badly. The profile should do one thing well: create a clean water break and a durable edge at the roof perimeter. If the metal is too short, too thin, or bent out of shape, it loses that advantage quickly.
One detail worth checking is thickness. A common code baseline for the metal is a nominal 0.019 inch, and that is not a random number; it gives the flashing enough body to stay straight, fasten properly, and resist distortion during installation. Thinner material can work in some product systems, but it is not where I would cut corners on a roof that needs to last.
Installation details that prevent leaks
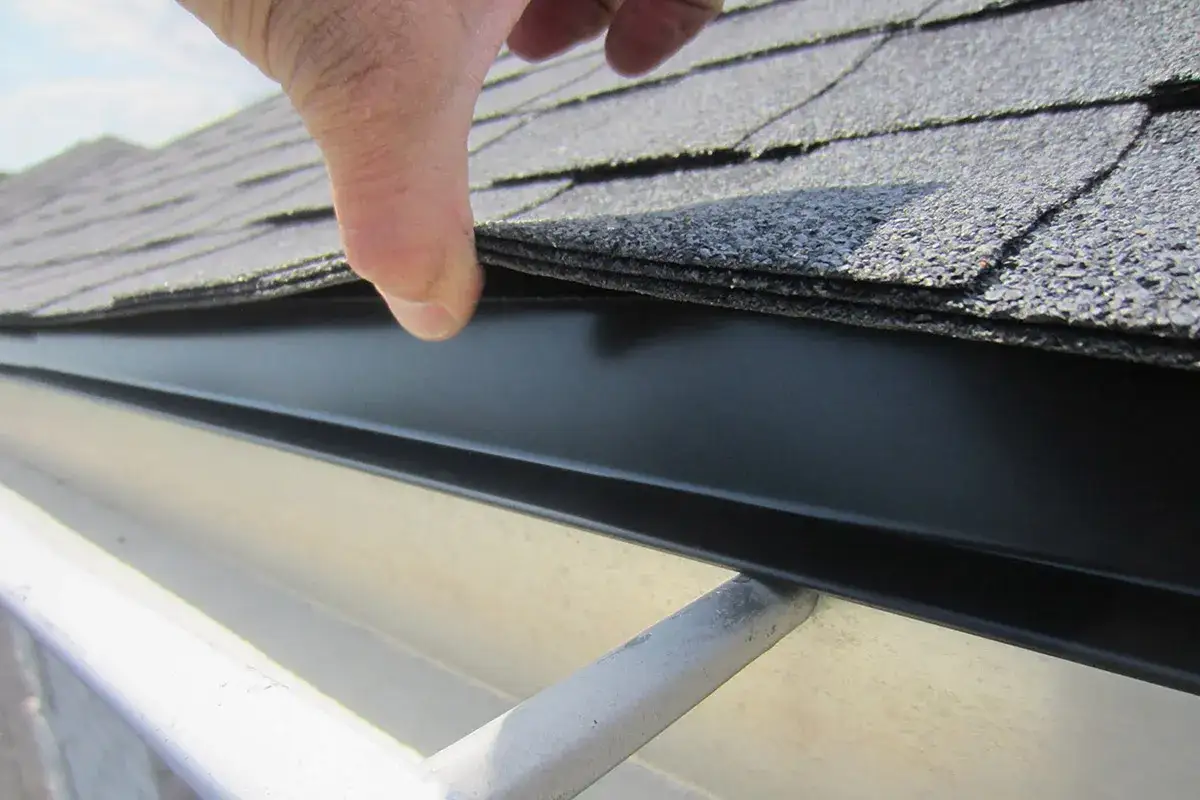
When I watch a roofing crew install edge metal, I look for discipline more than speed. Good work is methodical. The deck edge should be clean and sound, the pieces should lap correctly, and the fasteners should stay consistent. A sloppy perimeter often means the rest of the roof was rushed too.
- Start with a straight, solid edge. If the sheathing is rotten or uneven, fix that first.
- Install the eave metal so runoff moves outward, then place the underlayment in the correct order over it.
- Keep end laps at least 2 inches and stagger joints when possible so water does not track straight through the seam line.
- Fasten the metal at the spacing required by the code or product instructions, usually no more than 12 inches on center.
- At rake edges, keep the layer order correct so water sheds over the metal instead of behind it.
- Let shingles project just enough to do their job without hanging awkwardly over the edge.
The biggest mistake I see is not dramatic. It is a small reversal of layers or a short piece of metal that looks fine from the ground. That kind of mistake is dangerous because it can pass a casual visual check but still direct water into the fascia board. A clean installation should look simple and boring, which is exactly what you want at the roof edge.
In tougher climates, especially where ice or wind-driven rain is common, the perimeter details need even more care. The flashing does not replace proper underlayment, but it does complement it. When both layers are done correctly, the roof edge becomes far more forgiving.
Signs the roof edge needs attention
Edge problems usually show themselves before the roof fails everywhere else. I look for rust streaks, lifted seams, bent ends, nails that have backed out, and wood trim that looks darker than the surrounding areas. Gutter overflow is another clue, but not always because the gutters are the real problem; sometimes the runoff is simply being released too close to the fascia.
There are also times when replacement makes more sense than repair. If the flashing is badly warped, if the fastener holes have stretched, or if the roof is being fully reroofed anyway, I prefer fresh metal rather than trying to salvage the old pieces. The cost difference is usually minor compared with the damage a weak perimeter can cause later.
I also check the edge detail after storms and after any gutter work. A gutter replacement can change how water lands at the perimeter, and a roof that looked fine before may now dump too close to the trim. That is the sort of small change that turns into a maintenance issue if nobody notices it.
The detail that keeps the whole perimeter honest
When the drip edge is missing, installed backward, or cut too short, the failure is rarely dramatic at first. It usually shows up as staining, soft trim, or water running where it should never have been allowed to go. That is why I treat this piece of metal as a structural water-control detail, not a minor accessory.
If you are planning a reroof, ask how the edge will be sequenced with the underlayment, what material will be used, and how the crew will handle the eaves versus the rakes. Those three questions tell you a lot about the quality of the install. A roof can have good shingles and still perform badly if the perimeter detail is weak.
For homeowners, the practical takeaway is simple: inspect the roof edge whenever you inspect the gutters, and do not ignore staining or lifted metal just because the roof surface itself still looks fine. The perimeter is where water tries to get clever, and the best defense is a clean, properly installed flashing line.