
A solid dishwasher installation is less about sliding a machine into a cabinet and more about making water, drain, and power behave like a single system. In a typical U.S. kitchen, the job lives or dies on a few details: a reliable hot-water feed, a drain path that cannot siphon backward, and a unit that sits level and secured. I am focusing here on the practical side of the work, so you can see what has to be ready, how the connections should be routed, and where leaks usually start.
The essentials at a glance
- Most built-in dishwashers need hot water, a drain tie-in, and a dedicated grounded 120V circuit.
- The drain hose should rise in a high loop, or use an air gap if local code requires one.
- An accessible shutoff valve under the sink makes future service much easier.
- Leveling matters because a tilted unit can leak, rattle, or fail to drain cleanly.
- Most trouble after the hookup comes from kinks, loose clamps, or a missed disposer knockout plug.
What a proper dishwasher installation needs before you start
I treat the rough-in as the real foundation of the job. If the cabinet opening is tight, the shutoff valve is buried, or the electrical point is in the wrong place, the appliance itself becomes the easy part. For a simple replacement, the work may only take a couple of hours. For a first-time install, I expect the prep to take much longer because plumbing and electrical access often need to be created before the unit ever moves into place.
| Item | What I check | Why it matters |
|---|---|---|
| Hot water supply | Accessible shutoff valve and approved supply line | Lets the dishwasher fill correctly and makes future service simpler |
| Drain path | High loop or air gap, with no kinks or sags | Prevents backflow, odors, and standing water in the tub |
| Power | Dedicated 120V grounded circuit or the model’s approved electrical setup | Reduces nuisance trips and avoids unsafe wiring shortcuts |
| Cabinet fit | Enough room for the body, hose routing, and door swing | Keeps the machine from binding, rubbing, or tipping when the door opens |
I also verify the model’s manual before I start cutting or connecting anything. Dimensions, cord requirements, and hose routing can vary enough between models that guessing is a bad habit. Once those basics are in order, the plumbing work becomes much more predictable.
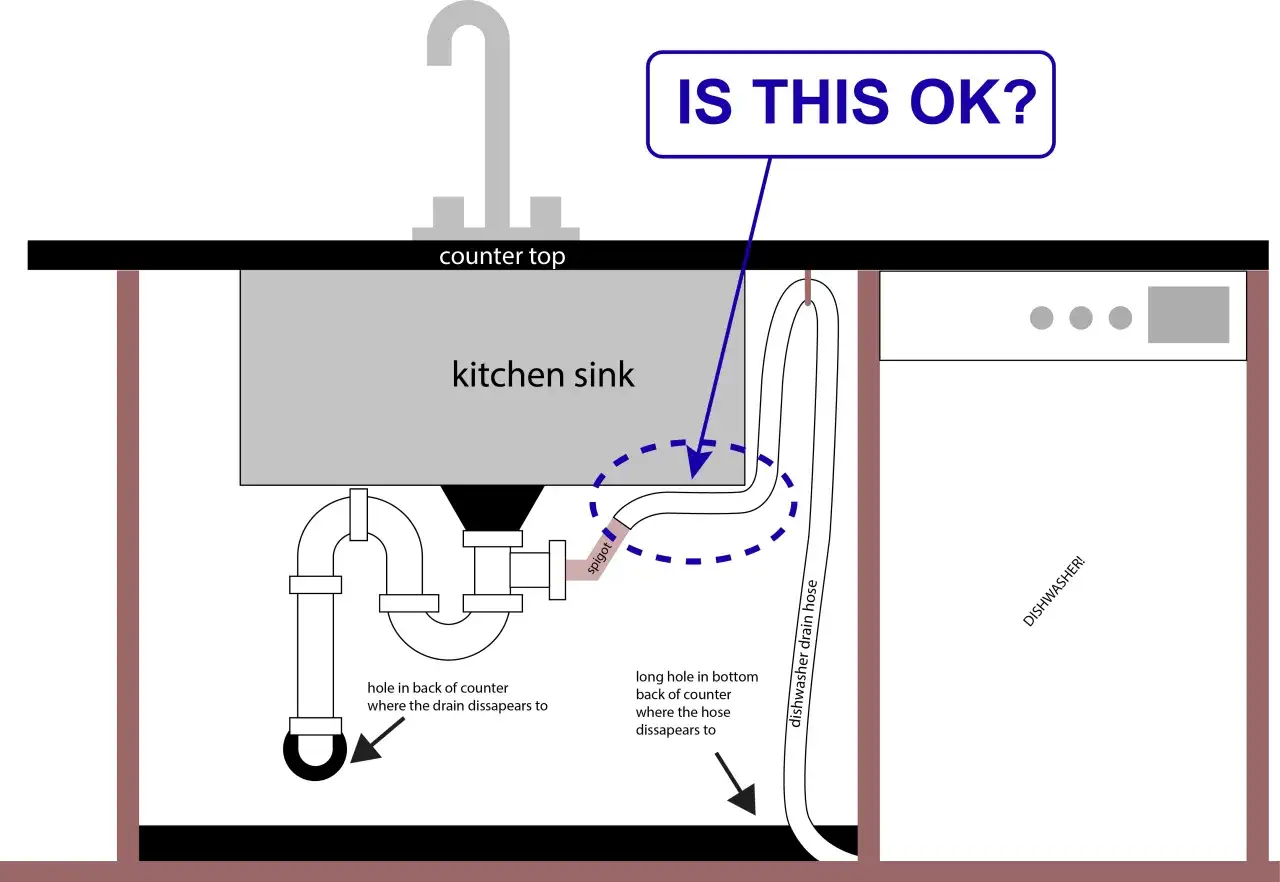
How the plumbing connection should be routed
The plumbing side is where most people either do the job cleanly or create a problem they will revisit later. The dishwasher needs a hot-water feed and a drain path, but the drain path is the part I watch most closely. It should rise high enough to prevent dirty sink water from backing into the tub, and it should never sag in a way that encourages siphoning.
| Drain setup | When it makes sense | Tradeoff |
|---|---|---|
| High loop | Common in many homes where the cabinet height allows a proper rise | Simple and compact, but not always enough where code requires an air gap |
| Air gap | Used where local plumbing code demands extra backflow protection | More visible under the sink, but more robust against siphoning |
I like to keep the drain hose as high as the cabinet allows, with at least 20 inches of rise above the floor as a practical target. If the dishwasher drains into a garbage disposal, the knockout plug has to come out first or the machine may not drain at all. That one overlooked step causes more unnecessary callbacks than people expect.
The water supply line deserves the same care. I flush the line before making the final connection so grit or solder debris does not end up in the inlet valve. The line should have a clean path with no sharp bends, and the shutoff valve should be easy to reach from the sink cabinet. If the hose is forced into a tight turn behind the unit, the fill rate suffers and the fitting is more likely to weep later. Once that routing is clean, the actual install goes much faster.
The installation sequence that avoids rework
- Turn off power and water before touching the appliance or the lines behind it.
- Remove the toe-kick or access panel so the supply line, drain hose, and electrical connection are all visible.
- Prep the cabinet opening, including any pass-through holes, edge protection, or grommets the hoses need.
- Position the dishwasher carefully and slide it into place without crushing the hoses behind it.
- Connect the drain line first, then the water supply, so you are not fighting a cramped workspace after the unit is fully seated.
- Plug in or hardwire the unit only as the model manual allows, and do not leave loose conductors exposed.
- Level the machine front-to-back and side-to-side, then secure it to the cabinet or floor as required.
- Run a short test cycle and inspect every joint with a flashlight while water is moving through the system.
When I test a job, I stay with it long enough to catch a slow drip, not just a dramatic leak. I look under the sink, at the supply fitting, around the drain clamp, and at the disposal connection while the machine fills and drains. A 10 to 15 minute test run is usually enough to reveal a bad connection, and it is much easier to fix before the toe-kick goes back on.
Common mistakes that cause leaks, odors, and standing water
The failures I see most often are not exotic. They are basic routing and connection mistakes that become obvious only after the machine has run a few cycles. The good news is that they are easy to prevent if you know where to look before you button up the cabinet.
| Mistake | What it leads to | Better move |
|---|---|---|
| Drain hose routed low or allowed to sag | Backflow, odors, or standing water in the tub | Form a high loop and secure it so it cannot drop over time |
| Garbage disposal knockout plug left in place | The dishwasher fills but will not drain | Remove the plug before attaching the drain hose |
| Loose supply fitting or clamp | Slow cabinet leak that may only show after a hot cycle | Tighten connections, then recheck them after the first run |
| Kinked water line or hose | Weak fill, poor wash performance, or noisy operation | Reroute the line with a gentler bend and enough slack |
| Unsecured unit | Tipping when the door opens, especially on a light cabinet floor | Anchor the dishwasher the way the manufacturer specifies |
| Wrong electrical setup | Tripping, poor grounding, or unsafe service conditions | Use the approved circuit and let a qualified electrician handle changes |
I also see people rush the leveling step because the machine appears straight once it is pushed under the counter. That is not enough. A unit can look fine and still lean just enough to keep the door from sealing evenly or to leave water pooled in the sump. A few extra minutes with a level saves a lot of guesswork later.
When I would bring in a plumber or electrician
There is a point where this stops being a straightforward appliance swap and becomes a small renovation. That usually happens when there is no shutoff valve, the drain has to be rerouted, the disposal needs a new connection, or the electrical circuit needs to be added or corrected. At that stage, I would rather bring in the right trades than improvise around hidden cabinetry and finished walls.
- No accessible shutoff valve under the sink.
- Supply lines that are corroded, old, or made of material I would not trust behind a finished cabinet.
- A hardwired setup that does not match the model’s electrical instructions.
- A drain connection that is too low to support a proper loop without an air gap.
- Any sign of a leak inside the wall, not just under the sink.
I am comfortable saying this bluntly: if you are unsure about grounding, branch-circuit capacity, or local plumbing requirements for the drain, that is the moment to stop. The cost of one service call is small compared with repairing a soaked cabinet base or a repeat leak that has been hiding behind the toe-kick. Once the infrastructure is right, the appliance itself is the easy part.
What I would check before calling the job finished
Before I declare the work done, I look for the boring details that keep the installation quiet and stable. Those details do not feel dramatic at the moment, but they decide whether the machine is still trouble-free six months later.
- The dishwasher sits level and does not rock when I open the door.
- The door closes without rubbing the floor, adjacent cabinet, or surrounding trim.
- All visible fittings are dry after a fill and drain cycle.
- The drain hose is secured high enough that it cannot sag into a low spot.
- The unit is anchored and does not shift when the door is loaded.
- The first cycle drains completely, with no standing water left in the tub.
After that first test, I like to recheck the fittings once more after the machine has been through a few hot cycles. Fittings settle, hoses relax, and a tiny weep that was invisible at first can show up later under heat and vibration. If everything stays dry and the drain stays clear, the install is doing exactly what it should: disappearing into the background.
In practice, a reliable setup comes down to three things that never get old: a clean water feed, a drain line that rises the right way, and a machine that is level and secured before the panel goes back on. When those parts are handled with care, the dishwasher stops being a source of repair work and starts doing the quiet job it was meant to do.